The Dell Dimension 8200 Upgrade To A Pentium Dual Core
I thought my second motherboard was defective but was all right after the bios update to version 3.30. I've decided to use this second Asrock 775i65g motherboard to upgrade my Old Dell dimension 8200. Since this is a spare computer that doesn't get a whole lot of use, I've purchased a somewhat better Intel Pentium dual core to replace the one on another computer using the same motherboard and two faster Super Talent 1 GB modules PC 3200 with a timing of 2.5. The parts that I took off that computer will be used for this Dell upgrade. The parts are: Intel Pentium dual core e5300 and two Super Talent 1 GB modules PC 3200 with the timing of 3 are used running at 25% overclocked obtaining 3.26 GHz. I've overclocked the computer about 25% which raised the bus speed from 800 MHz to 1000 MHz by setting the CPU in the bios to manual instead of automatic. Next, raising the clock from 200 to 251 MHz which is quad pumped to 1004 MHz. This brings the CPU clock speed to 3.26 MHz (251 MHz X 13 = 3.26 MHz). The initial setting that I use for the memory speed when was clocked at 200 MHz was set for PC 2700 which operates at 167 MHz instead of PC 3200. With this setting by the time I increase the bus speed to 251 MHz the actual memory bus speed would be at 209.58 MHz (251 X .853 = 209.58 MHz ) Which is tolerable for these memory modules. If I left the memory at the default clocking the memory speed will be at 1 to 1 which is 251 MHz. The computer would probably not run at this clocking which is beyond the capability of these memories. Luckily with this motherboard when you increase the bus speed the AGP and PCI bus speed remains at the default 67 MHz and 33 MHz respectively. In many cases, the graphics card or the add-on PCI cards will not tolerate higher bus speeds. Also hard drives and CD or DVD drives will not tolerate higher bus speed as well and will fail to work when the PCI bus speed is increased from the default 33 MHz to beyond 36 MHz or so. Some Dell computers particularly ones a couple years ago tend to use proprietary parts that aren't compatible with standard ATX or micro ATX motherboards. Even the power supplies on those units may not be compatible. Even though the plugs may fit, the wiring may be completely different. If you try to plug those in to a standard motherboard, the end result are fried parts. Luckily the stock power supply on this unit is standard ATX configuration. The case on the other hand are completely proprietary. I manage to modify it to fit the standard micro ATX motherboard. I took out the motherboard along with the back mounting panel from the case. The back mounting panel is secure with six rails and one screw to the left side of the case. After removing the motherboard from that panel, I've noticed several metal protrusion or humps to provide the motherboard standoff and mounting. The location is different from a standard micro ATX. So I took a hammer and flatten the protrusion to the level of the back plate. Also, on the back of the case the metal panel with the holes for the plugs for the outputs is part of the case and not removable. I took a pair of tin snips and cut off that part of the panel so I can insert the one provided by the new motherboard. I use a file to smooth down the rough cut edges and remounted the the motherboard back mounting panel in the case. I temporary use some small pieces of quarter inch wood spacers and next place the new motherboard after inserting the metal back plate at the rear of the case for fit so I can drill mounting holes for the motherboard. For the exact fit I also fitted temporarily 2 cards. After getting the correct position, I used a small screwdriver to score the metal back plate beneath the motherboard. I took out the metal back plate and drill some eighth inch holes. Number eight screws about half-inch long was used. I files the screw heads almost flat so it won't interfere with the mounting of the back plate in the case. The screws were secured to the back plate using 2 nuts each underneath the motherboard as spacers. The motherboard is secured with the remaining nut on top each. After mounting the motherboard, I had to modify the front panel wiring as well as extending the wiring for the rear fan. Dell uses nonstandard proprietary wiring for the front panel as well and need to be extensively rewired in order for it to work. The original Dell wiring for the USB was done with a flat ribbon cable which isn't suitable for USB 2. So I took a standard shielded USB connecting cable and cut off 2 lengths that I needed in order to connect the motherboard's USB header to the front panel USB plugs. I've also hooked up the front speaker or headphone plug as well. I could have just simply bought a case to go with the upgrade instead of all this work to modifying the original Dell's case. I wanted to keep the original Dell appearance. After finishing the construction of this upgrade, I did notice the computer was many times faster than before. Using Windows 7 when it was running with the old motherboard and then after to upgrade, I noticed that it did not require a repair or reinstallation of Windows 7 in order for it to run. It's simply install all of the require drivers automatically. With the earlier Windows versions, a repair or reinstallation was required. In order to keep using Windows after replacing the motherboard and CPU, I would have to reactivate immediately with a new license. In my case, with a retail and not an OEM or upgrade version of Windows all I need to do is to call Microsoft and obtain a new product key. I thought the problem with the computer freezing would go away with the reinstallation of Windows. I've decided to reinstall Windows to see if any improvement if any. The problem was still there after the reinstallation. So that wasn't it, using a process of elimination the culprit was found. Everything working fine until I did some graphics intensive tests and found out the computer would freeze like it did before the upgrade. Many times, it would freeze completely requiring a force shutdown by holding down on off button for more than 4 second until it shuts down. The problem turned out to be a defective video card. Using a process of elimination by trying the onboard graphics and as well as using another video card from my other computer. The computer runs fine using another video card under the same intensive condition. I bought a replacement video card that has the same video chipset but with twice the memory of another brand. Since this is my spare computer, I didn't want to spend a lot of money on it. The original NVIDIA G-Force 6200 with 128 MB of memory was made by PNY and the replacement one is made by Gvga. This new one has 256 MB of GDDR2 memory with an effective 532MHz clock speed. The new video card performs slightly better than the old one when old one was working. Using the older video driver, the computer sometimes still freezes under intensive graphics until I updated the driver to the latest ones offered by NVIDIA. The driver updated to is version 197.45. Update May 29, 2010: I've found out even with the latest bios update, unfortunately this motherboard does not support booting from the USB. Even though in the bios there is an option to set booting from the USB. When I tried to boot my bootable jump drive, it only returns a prompt indicating "error" yet the drive works fine on my other computer. As far as I can tell, the latest bios does support booting from the USB, but yet it does not work no matter how I tried. I have some feeling that the problem lies with the hardware that does not support booting from the USB. Although, not able to boot from USB is no hardship with this computer since it has a floppy drive. Otherwise everything works fine with this system. Update September 19, 2010: This computer continue to be reliable and almost as fast as my fastest one in the house which is my Core2 Duo one. With the Pentium dual core CPU plus overclocking, the computer performs extremely well as compare with a Pentium 4 system. The speed is increased close to 3 1/2 times faster than a Pentium 4 system of equal clock speeds. Since I already have this Asrock motherboard on hand. I thought it would make economic sense to use it. But if I had to start scratch with all new parts, it wouldn't be a good idea to use this motherboard but to simply use a more modern one that utilize DDR 2 and PCI express.The reason also for this, the CPU that was used wouldn't be fully compatible without a bios update to 3.3 version. Unless you have enough experience on updating the bios, which can be a little tricky. It is possible to kill the bios chip if the power should happen to go out in the middle of updating which will render the motherboard useless. Better yet when starting from scratch if you don't mind paying a little more for a system. Is to build one that utilize an Intel Core i3 or i5 CPU utilizing a compatible inexpensive motherboard that has Socket 1156. |
|
|
|
|
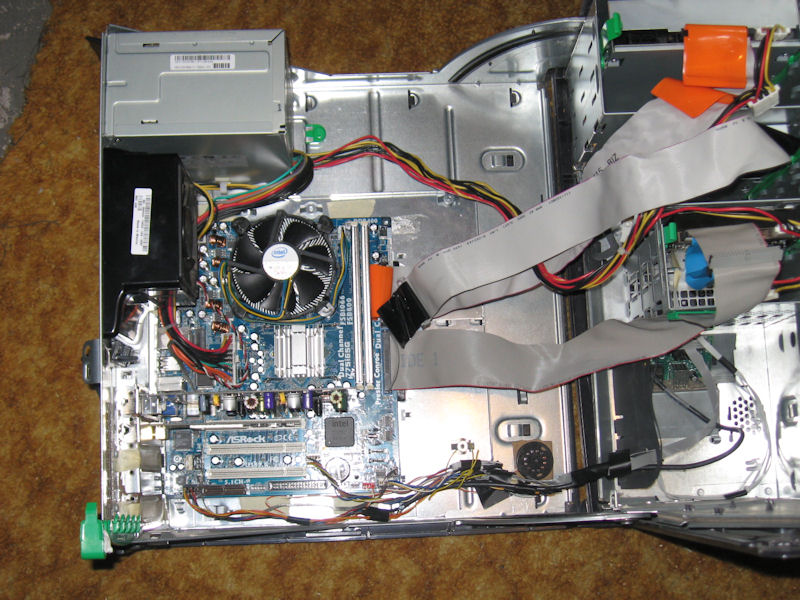
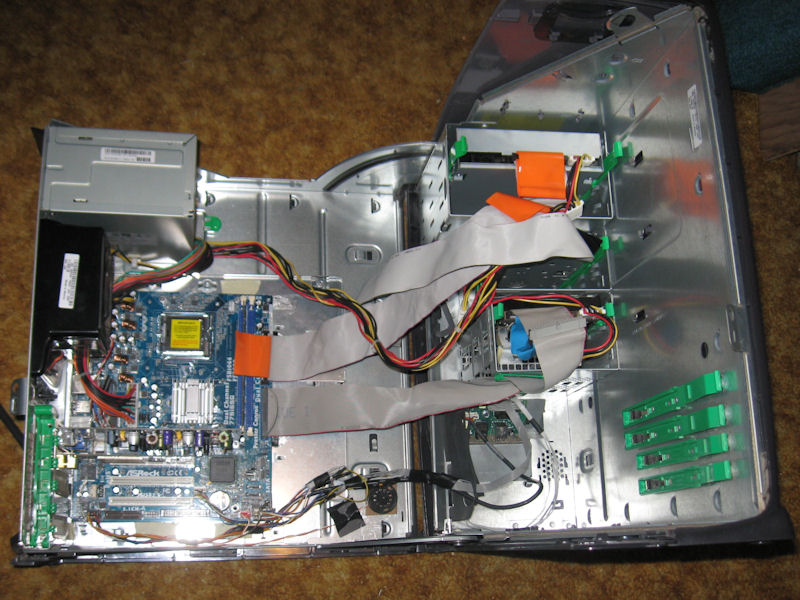
The Dell computer with the modification

The same Asrock 775i65g micro ATX motherboard as used in Marcomputer4

The Dell computer case wide open showing the new motherboard fitted after extensive modifications
Here is a closer picture showing the motherboard

And here with the new CPU and two memory modules installed